

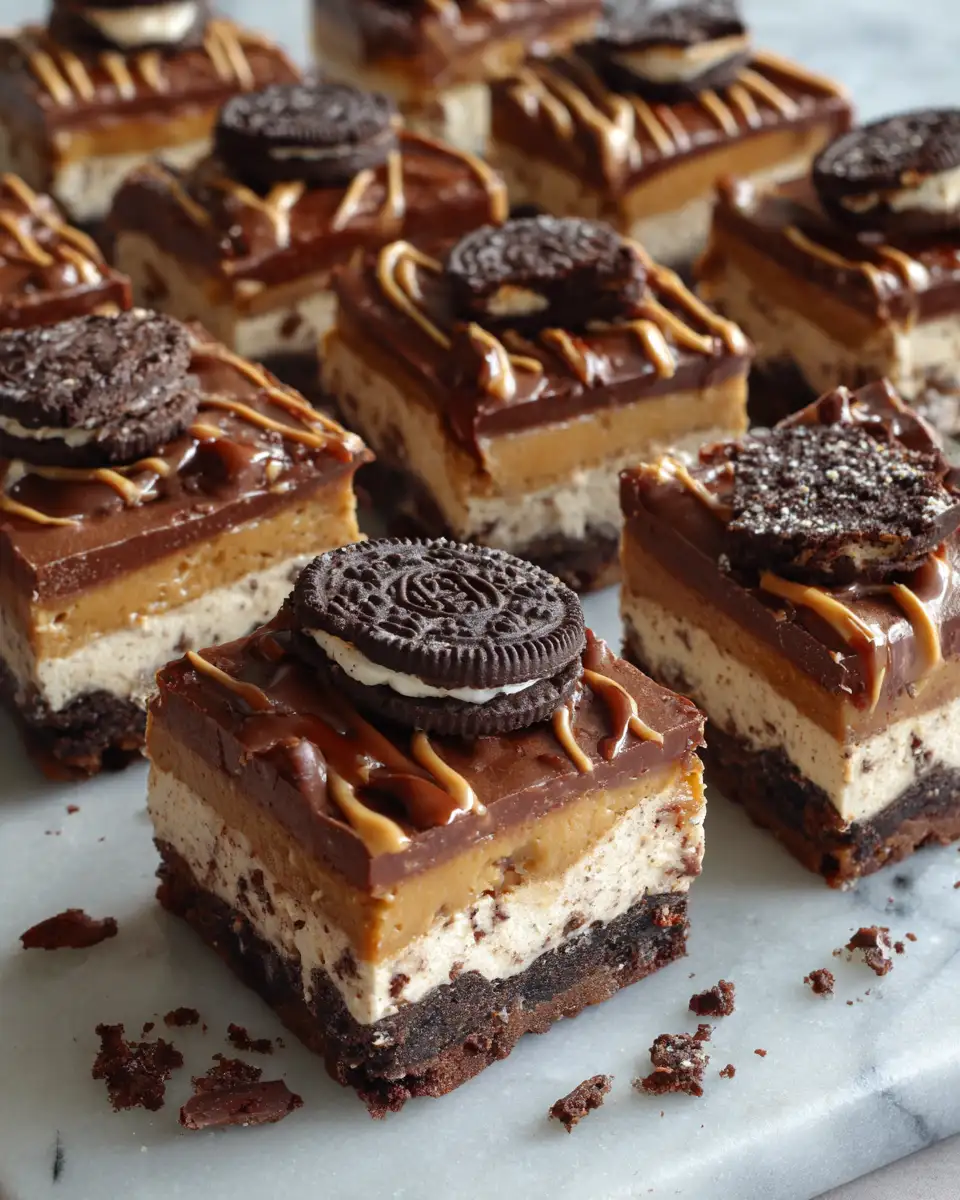
There’s something undeniably comforting about a dessert that doesn’t require the oven to heat up your kitchen—especially here in sunny San Diego where I’d rather be outside than stuck inside baking. These No-Bake Oreo Peanut Butter Bars are exactly that kind of treat: rich, indulgent, and surprisingly simple to whip up. I first discovered this combo during a busy week when my kids demanded something sweet but I was short on time and energy. The mix of crunchy Oreos and creamy peanut butter brought instant smiles all around and reminded me how food can be a quick source of joy and connection, even on the busiest days.
Table of Contents
Why You’ll Love This No-Bake Oreo Peanut Butter Bars
What makes these bars stand out is their perfect balance between convenience and indulgence. They require no baking, which means you get a delicious treat with minimal fuss—something that’s been a lifesaver in my kitchen on hectic school nights. The Oreo crust adds a nostalgic crunch that takes me right back to my childhood in England, while the peanut butter layer brings a creamy, nutty richness that feels like a little hug in every bite. Plus, they hold up well in the fridge, making them perfect for sharing or saving for later. It’s a simple recipe that never fails to impress, whether you’re making it for family or friends.
Ingredients You’ll Need for This No-Bake Oreo Peanut Butter Bars

The key to this dish lies in selecting the right ingredients—fresh, quality peanut butter and iconic Oreos are essential. I always reach for natural peanut butter with no added sugar or oils, as it gives a cleaner, more authentic flavor that isn’t overly sweet. The Oreos provide a familiar crunch and a hint of chocolate that pairs beautifully with the nutty layer. If you want to switch things up, I’ve included a couple of substitutions to keep your pantry happy.
- 24 Oreo cookies (about 1 and 1/2 cups crushed)
- 6 tablespoons unsalted butter, melted
- 1 cup creamy natural peanut butter
- 1 cup powdered sugar
- 1 teaspoon vanilla extract
- 1/2 cup semi-sweet chocolate chips (optional, for topping)
- 1 tablespoon coconut oil (optional, to smooth chocolate topping)
Substitutions: Swap Oreos for any chocolate sandwich cookie you like, or use almond butter instead of peanut butter for a different nutty twist.
Nutrition Facts
- Calories: Approximately 320 per serving (1 bar, assuming 12 bars)
- Protein: 6g
- Fat: 22g
- Carbohydrates: 28g
- Fiber: 2g
- Sugar: 18g
- Sodium: 150mg

Irresistible No-Bake Oreo Peanut Butter Bars You Have to Try
Learn how to make delicious No-Bake Oreo Peanut Butter Bars. Easy recipe with step-by-step instructions.
- Total Time: 45 minutes
- Yield: 4 servings 1x
Ingredients
The key to this dish lies in selecting the right ingredients—fresh, quality peanut butter and iconic Oreos are essential. I always reach for natural peanut butter with no added sugar or oils, as it gives a cleaner, more authentic flavor that isn’t overly sweet. The Oreos provide a familiar crunch and a hint of chocolate that pairs beautifully with the nutty layer. If you want to switch things up, I’ve included a couple of substitutions to keep your pantry happy.
- 24 Oreo cookies (about 1 and 1/2 cups crushed)
- 6 tablespoons unsalted butter, melted
- 1 cup creamy natural peanut butter
- 1 cup powdered sugar
- 1 teaspoon vanilla extract
- 1/2 cup semi-sweet chocolate chips (optional, for topping)
- 1 tablespoon coconut oil (optional, to smooth chocolate topping)
Substitutions: Swap Oreos for any chocolate sandwich cookie you like, or use almond butter instead of peanut butter for a different nutty twist.
Instructions
- Line an 8×8-inch baking dish with parchment paper, leaving some overhang for easy removal later.
- Place the Oreo cookies in a food processor and pulse until they form fine crumbs. If you don’t have a processor, place cookies in a sealed bag and crush with a rolling pin.
- Transfer the Oreo crumbs to a bowl and mix in the melted butter until the mixture holds together when pressed.
- Press the crumb mixture evenly into the bottom of the prepared pan to form a firm crust. Chill in the fridge while you prepare the peanut butter layer.
- In a separate bowl, combine the peanut butter, powdered sugar, and vanilla extract. Stir until smooth and thick. If the mixture feels too stiff, add a teaspoon of milk to loosen it slightly.
- Spread the peanut butter mixture evenly over the chilled Oreo crust. Return to the fridge for at least 30 minutes to set.
- Optional: Melt chocolate chips and coconut oil together gently over a double boiler or in short bursts in the microwave. Drizzle or spread the chocolate over the peanut butter layer.
- Chill for another 30 minutes, or until the chocolate is firm.
- Lift the bars out of the pan using the parchment paper overhang and cut into 12 squares. Serve chilled.
- Prep Time: 15 minutes
- Cook Time: 30 minutes
- Category: Main Dish
- Method: Cooking
- Cuisine: International
Steps to Create Your No-Bake Oreo Peanut Butter Bars
- Line an 8×8-inch baking dish with parchment paper, leaving some overhang for easy removal later.
- Place the Oreo cookies in a food processor and pulse until they form fine crumbs. If you don’t have a processor, place cookies in a sealed bag and crush with a rolling pin.
- Transfer the Oreo crumbs to a bowl and mix in the melted butter until the mixture holds together when pressed.
- Press the crumb mixture evenly into the bottom of the prepared pan to form a firm crust. Chill in the fridge while you prepare the peanut butter layer.
- In a separate bowl, combine the peanut butter, powdered sugar, and vanilla extract. Stir until smooth and thick. If the mixture feels too stiff, add a teaspoon of milk to loosen it slightly.
- Spread the peanut butter mixture evenly over the chilled Oreo crust. Return to the fridge for at least 30 minutes to set.
- Optional: Melt chocolate chips and coconut oil together gently over a double boiler or in short bursts in the microwave. Drizzle or spread the chocolate over the peanut butter layer.
- Chill for another 30 minutes, or until the chocolate is firm.
- Lift the bars out of the pan using the parchment paper overhang and cut into 12 squares. Serve chilled.
Tips for Making the Best No-Bake Oreo Peanut Butter Bars
Getting these bars just right is all about technique and ingredient quality, especially since there’s no baking to “fix” anything. I’ve learned from years in restaurant kitchens that precision and patience make a huge difference, even with simple recipes. Learn more: Irresistible Strawberry Shortcake Cream Bars You Have to Try
- Use natural peanut butter with no added oils or sugars for the cleanest flavor and best texture.
- Ensure the Oreo crust is firmly pressed and chilled—it acts as the base, so it needs to hold together well when cutting.
- If your peanut butter mixture is too runny, add extra powdered sugar gradually; too stiff, add a splash of milk for spreadability.
- For a glossy chocolate finish, melting chocolate with a bit of coconut oil helps it set smoothly and makes slicing neater.
- Chill the bars long enough between layers to avoid mixing and to keep clean lines.
With these tips, you’ll create a dessert that’s as good as any bakery’s. Learn more: related recipe
Serving Suggestions and Pairings

This dessert is a real crowd-pleaser and fits perfectly into casual family gatherings or as a sweet finish to weekend brunch. I often make a batch when friends come over, pairing it with coffee or a simple glass of cold milk. The rich peanut butter and chocolate flavors also work well with fresh fruit to lighten the plate.
- Serve with a dollop of whipped cream or a scoop of vanilla ice cream for an extra indulgent treat.
- Pair with fresh berries like raspberries or strawberries to add a bright, tart contrast.
- Make mini versions in cupcake liners for easy party bites or lunchbox treats.
- Try swapping in white chocolate chips for the topping in summer for a lighter look and flavor.
Whether it’s a quick weekday treat or a special weekend dessert, these bars always bring smiles to my family’s table.
Storage and Reheating Tips
Proper storage is crucial for keeping these bars fresh and enjoyable. Because they’re no-bake and chilled, they hold up well but do best when kept cool.
- Store in an airtight container in the refrigerator for up to 5 days.
- If you want to keep them longer, freeze the bars for up to 2 months; thaw in the fridge before serving.
- No reheating needed—serve chilled straight from the fridge for the best texture.
- To make slicing easier after refrigeration, let the bars sit at room temperature for 5-10 minutes before cutting.
Frequently Asked Questions
What are the main ingredients for No-Bake Oreo Peanut Butter Bars?
The main ingredients for No-Bake Oreo Peanut Butter Bars include the items listed in our ingredients section above. Each ingredient plays a crucial role in achieving the perfect flavor and texture.
How long does it take to make No-Bake Oreo Peanut Butter Bars?
The total time to make No-Bake Oreo Peanut Butter Bars includes both preparation and cooking time. Check the recipe card above for exact timing details.
Can I make No-Bake Oreo Peanut Butter Bars ahead of time?
Yes, No-Bake Oreo Peanut Butter Bars can often be prepared in advance. Store it properly in an airtight container in the refrigerator and consume within the recommended timeframe.
What can I serve with No-Bake Oreo Peanut Butter Bars?
No-Bake Oreo Peanut Butter Bars pairs well with various sides and accompaniments. Consider the serving suggestions mentioned in the recipe for the best dining experience.
Is No-Bake Oreo Peanut Butter Bars suitable for special diets?
Depending on the ingredients used, No-Bake Oreo Peanut Butter Bars may be adapted for various dietary needs. Check the ingredients list and consider substitutions as needed for your dietary requirements.
Final Thoughts
I hope these No-Bake Oreo Peanut Butter Bars bring a little sweetness and ease to your kitchen like they have to mine. They’re proof that sometimes the simplest recipes carry the most joy—especially when shared around the table with loved ones. If you try them, I’d love to hear how they turn out and any twists you put on the recipe!


")