

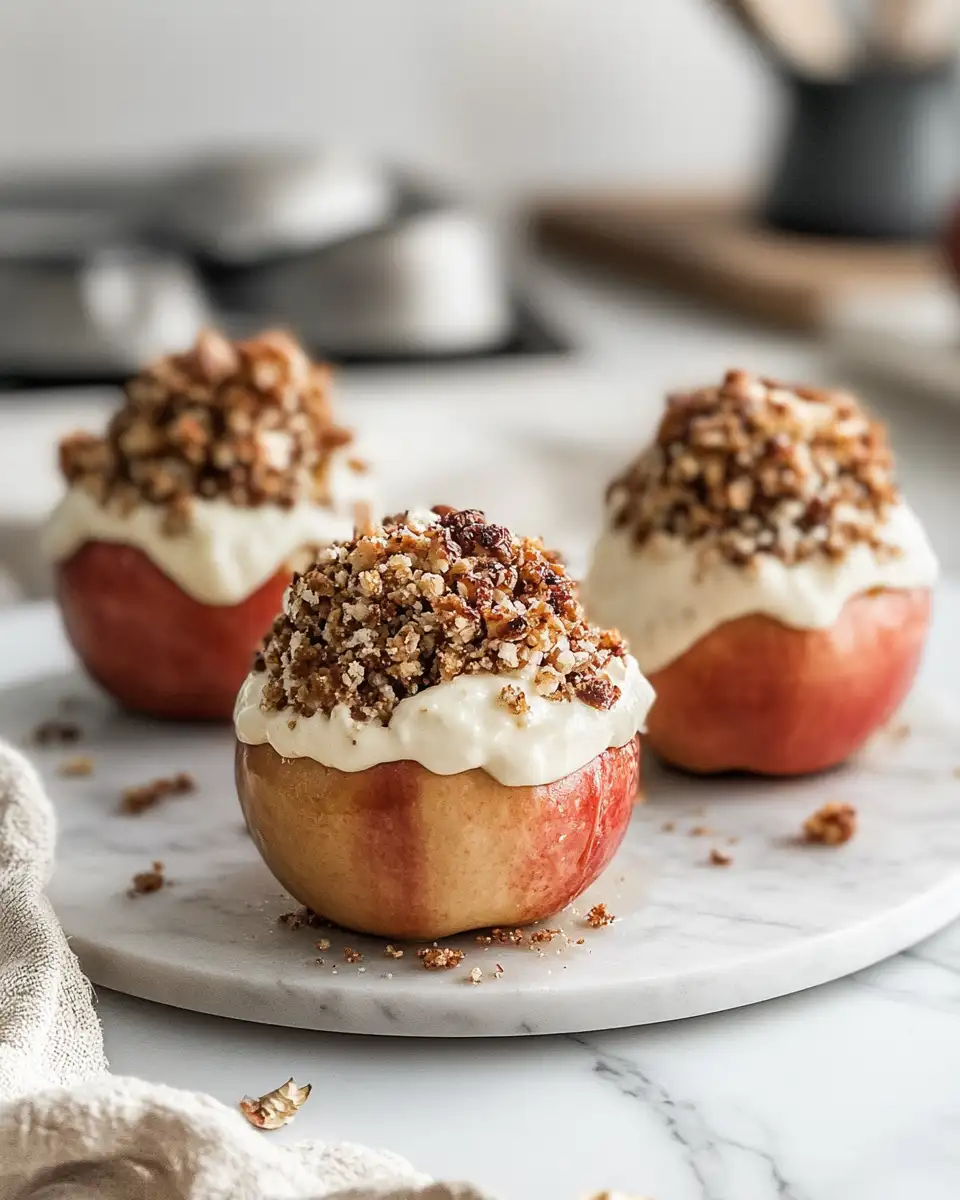
There’s a certain magic to desserts that weave together nostalgia and innovation, and these Cheesecake Stuffed Baked Apples do just that. Picture the warmth of a baked apple, filled to the brim with creamy cheesecake filling, each bite a delightful blend of crisp and smooth textures. It takes me back to my childhood in England, where afternoons with my mum and grandmother often meant sweet aromas wafting from the kitchen. Now, as a mom in San Diego, I love creating these little treasures for my own family, each apple a story waiting to be shared at our table.
Table of Contents
Why You’ll Love This Cheesecake Stuffed Baked Apples
These Cheesecake Stuffed Baked Apples are a delightful twist on classic comfort food. The combination of tart apples with rich, creamy cheesecake filling offers a perfect balance of flavors. This recipe is wonderfully simple, yet creates a dessert that feels indulgent and special. Inspired by my fond memories of experimenting in the kitchen, these apples bring together the joy of baking with the ease of everyday cooking. Plus, they’re a fantastic way to get creative with seasonal fruits, showcasing the best of both worlds.
Ingredients You’ll Need for This Cheesecake Stuffed Baked Apples

The key to this dish lies in selecting the right ingredients, allowing each flavor to shine through naturally. For the best results, choose firm, tart apples that can hold their shape during baking. Here’s what you’ll need:
- 6 large apples (Granny Smith or Honeycrisp work well)
- 8 oz cream cheese, softened
- 1/4 cup granulated sugar
- 1 teaspoon vanilla extract
- 1/2 teaspoon ground cinnamon
- 1/4 cup graham cracker crumbs
- 2 tablespoons melted butter
- 1 tablespoon lemon juice
Feel free to experiment with different apple varieties or add a pinch of nutmeg for extra warmth.
Nutrition Facts
- Calories: 280 per serving
- Protein: 4g
- Fat: 15g
- Carbohydrates: 35g
- Fiber: 5g
- Sugar: 28g
- Sodium: 150mg

Decadent Delight: Cheesecake Stuffed Baked Apples for the Perfect Fall Treat
Learn how to make delicious Cheesecake Stuffed Baked Apples. Easy recipe with step-by-step instructions.
- Total Time: 45 minutes
- Yield: 4 servings 1x
Ingredients
The key to this dish lies in selecting the right ingredients, allowing each flavor to shine through naturally. For the best results, choose firm, tart apples that can hold their shape during baking. Here’s what you’ll need:
- 6 large apples (Granny Smith or Honeycrisp work well)
- 8 oz cream cheese, softened
- 1/4 cup granulated sugar
- 1 teaspoon vanilla extract
- 1/2 teaspoon ground cinnamon
- 1/4 cup graham cracker crumbs
- 2 tablespoons melted butter
- 1 tablespoon lemon juice
Feel free to experiment with different apple varieties or add a pinch of nutmeg for extra warmth.
Instructions
- Preheat your oven to 350°F (175°C) and line a baking dish with parchment paper.
- Using a melon baller or small spoon, core the apples, leaving the bottom intact to create a well for the filling.
- In a medium bowl, beat together the cream cheese, sugar, and vanilla extract until smooth and creamy.
- Add the cinnamon and graham cracker crumbs to the cream cheese mixture, stirring until well combined.
- Spoon the cheesecake filling into each cored apple, packing it in gently.
- Brush the tops of the apples with melted butter and sprinkle with additional graham cracker crumbs if desired.
- Place the apples in the prepared baking dish, drizzle with lemon juice, and bake for 25-30 minutes, or until the apples are tender.
- Prep Time: 15 minutes
- Cook Time: 30 minutes
- Category: Main Dish
- Method: Cooking
- Cuisine: International
Steps to Create Your Cheesecake Stuffed Baked Apples
- Preheat your oven to 350°F (175°C) and line a baking dish with parchment paper.
- Using a melon baller or small spoon, core the apples, leaving the bottom intact to create a well for the filling.
- In a medium bowl, beat together the cream cheese, sugar, and vanilla extract until smooth and creamy.
- Add the cinnamon and graham cracker crumbs to the cream cheese mixture, stirring until well combined.
- Spoon the cheesecake filling into each cored apple, packing it in gently.
- Brush the tops of the apples with melted butter and sprinkle with additional graham cracker crumbs if desired.
- Place the apples in the prepared baking dish, drizzle with lemon juice, and bake for 25-30 minutes, or until the apples are tender.
Tips for Making the Best Cheesecake Stuffed Baked Apples
Getting this dish perfect requires attention to a few key details. Here are some tips to ensure your apples are just right:
- Choose apples that are similar in size for even baking.
- Ensure the cream cheese is softened to achieve a smooth filling.
- Keep an eye on the baking time; you want the apples soft but not mushy.
- Experiment with spices like nutmeg or cardamom for a unique flavor twist.
With these tips, you’ll create a delightful dessert that brings smiles to every face. Learn more: Bang Bang Chicken Bowl with Creamy Sauce Delight
Serving Suggestions and Pairings
This dish is incredibly versatile and works beautifully for various occasions, whether it’s a cozy family night or a gathering with friends. Here are some ideas:
- Pair with a scoop of vanilla ice cream for an extra indulgent treat.
- Serve with a drizzle of caramel sauce for a luxurious finish.
- Accompany with a warm cup of spiced apple cider or a crisp glass of Riesling.
Whether it’s a casual weeknight or a special celebration, these apples are sure to become a family favorite.
Storage and Reheating Tips
Proper storage ensures you can enjoy leftovers just as much as the fresh dish. Here’s how to keep them delicious:
- Store in an airtight container in the refrigerator for up to 3 days.
- Reheat gently in a preheated oven at 300°F (150°C) for about 10 minutes.
- For a quick option, microwave on medium power for 1-2 minutes.
These apples can be made ahead and warmed just before serving, perfect for busy schedules.
Frequently Asked Questions
What are the main ingredients for Cheesecake Stuffed Baked Apples?
The main ingredients for Cheesecake Stuffed Baked Apples include the items listed in our ingredients section above. Each ingredient plays a crucial role in achieving the perfect flavor and texture.
How long does it take to make Cheesecake Stuffed Baked Apples?
The total time to make Cheesecake Stuffed Baked Apples includes both preparation and cooking time. Check the recipe card above for exact timing details.
Can I make Cheesecake Stuffed Baked Apples ahead of time?
Yes, Cheesecake Stuffed Baked Apples can often be prepared in advance. Store it properly in an airtight container in the refrigerator and consume within the recommended timeframe.
What can I serve with Cheesecake Stuffed Baked Apples?
Cheesecake Stuffed Baked Apples pairs well with various sides and accompaniments. Consider the serving suggestions mentioned in the recipe for the best dining experience.
Is Cheesecake Stuffed Baked Apples suitable for special diets?
Depending on the ingredients used, Cheesecake Stuffed Baked Apples may be adapted for various dietary needs. Check the ingredients list and consider substitutions as needed for your dietary requirements.
Final Thoughts
I hope you’ll try these Cheesecake Stuffed Baked Apples and find them as delightful as my family and I do. They’re a simple yet impressive way to bring a bit of warmth and sweetness to your table. I’d love to hear how they turn out for you, so please feel free to share your experiences and any creative twists you might add. Happy cooking!


")