


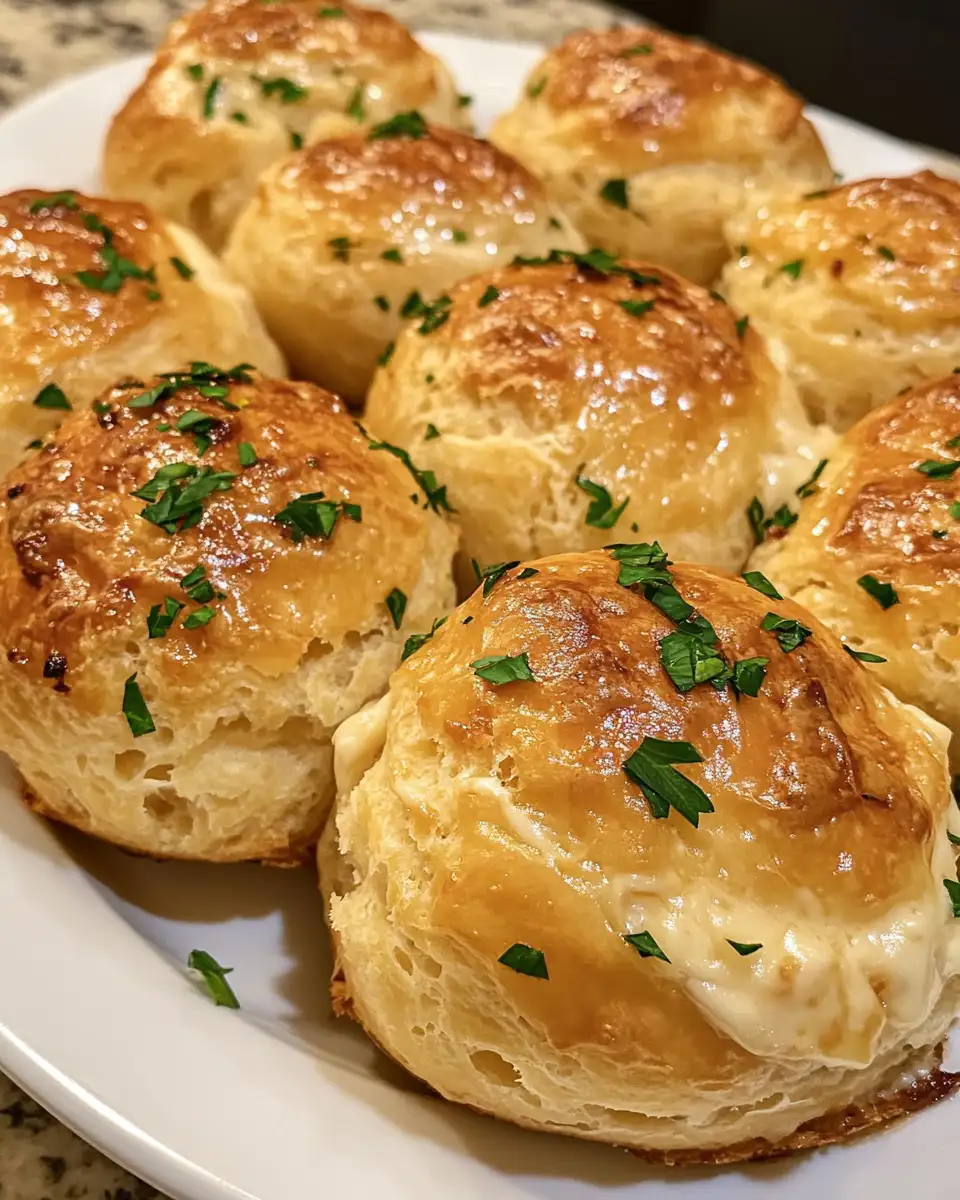
There’s something utterly irresistible about Pillsbury Biscuit Garlic Butter Cheese bombs—those golden pockets of buttery, garlicky dough hugging melty cheese inside. Whenever I whip these up, it’s like the whole kitchen fills with warmth and excitement, especially with my little ones eagerly waiting for their cheesy, finger-licking treasure. Growing up in a small English town, I learned early on that food is about more than just taste—it’s about creating moments of joy and connection. These cheese bombs are the perfect little celebration of that philosophy, blending simplicity with a comforting, indulgent flavor that always brings smiles around the table.
Table of Contents
Why You’ll Love This Pillsbury Biscuit Garlic Butter Cheese bombs
This recipe is a game-changer for busy weeknights or spontaneous gatherings. First, it’s incredibly quick—using Pillsbury biscuits means you skip the dough-making drama, which I appreciate after long days of juggling work and family. Second, the combination of garlic butter and gooey cheese delivers a flavor punch that’s both nostalgic and exciting. I remember my kids’ eyes lighting up the first time they bit into these, cheeks stuffed and grinning. Lastly, they’re so versatile—perfect as a side, snack, or party appetizer. They bring warmth, ease, and a bit of magic to any meal.
Ingredients You’ll Need for This Pillsbury Biscuit Garlic Butter Cheese bombs

The key to this dish lies in selecting the right ingredients—simple, fresh, and full of flavor. From my time in professional kitchens to family dinners in San Diego, I’ve learned that quality butter and cheese make all the difference. You don’t need fancy or complicated ingredients, just ones that shine on their own and work beautifully together.
- 1 can (16.3 oz) Pillsbury flaky biscuits (10 count)
- 4 tablespoons unsalted butter, melted
- 3 cloves garlic, minced
- 1 cup shredded mozzarella cheese
- 1/2 cup shredded cheddar cheese (optional for extra flavor)
- 1 teaspoon dried Italian seasoning or fresh chopped parsley
- Salt and freshly ground black pepper, to taste
If you prefer, you can swap mozzarella for provolone or a mild gouda for a different twist. For a dairy-free option, try vegan butter and cheese alternatives—though I haven’t tried this myself, I’d love to hear how it turns out!
Nutrition Facts
- Calories: Approximately 250 per cheese bomb
- Protein: 10g
- Fat: 18g (mostly from butter and cheese)
- Carbohydrates: 15g
- Fiber: 1g
- Sugar: 2g
- Sodium: 450mg
These are estimates based on reasonable portion sizes and standard ingredients. Keep in mind that using full-fat cheese and butter increases richness, which is part of the charm but worth noting if you’re watching intake.
Print
Irresistible Pillsbury Biscuit Garlic Butter Cheese Bombs You Need to Try
Learn how to make delicious Pillsbury Biscuit Garlic Butter Cheese bombs. Easy recipe with step-by-step instructions.
- Total Time: 45 minutes
- Yield: 4 servings 1x
Ingredients
The key to this dish lies in selecting the right ingredients—simple, fresh, and full of flavor. From my time in professional kitchens to family dinners in San Diego, I’ve learned that quality butter and cheese make all the difference. You don’t need fancy or complicated ingredients, just ones that shine on their own and work beautifully together.
- 1 can (16.3 oz) Pillsbury flaky biscuits (10 count)
- 4 tablespoons unsalted butter, melted
- 3 cloves garlic, minced
- 1 cup shredded mozzarella cheese
- 1/2 cup shredded cheddar cheese (optional for extra flavor)
- 1 teaspoon dried Italian seasoning or fresh chopped parsley
- Salt and freshly ground black pepper, to taste
If you prefer, you can swap mozzarella for provolone or a mild gouda for a different twist. For a dairy-free option, try vegan butter and cheese alternatives—though I haven’t tried this myself, I’d love to hear how it turns out!
Instructions
- Preheat your oven to 375°F (190°C) and line a baking sheet with parchment paper to prevent sticking.
- In a small bowl, mix the melted butter with minced garlic, Italian seasoning, salt, and pepper. Set aside to let the flavors meld.
- Open the can of Pillsbury biscuits and separate each biscuit. Using your hands, flatten each biscuit into a 4-inch circle on a clean surface.
- Place about 1 tablespoon of shredded mozzarella and cheddar cheese in the center of each flattened biscuit.
- Carefully fold the edges up and pinch together to seal the cheese inside, forming a small ball. Make sure there are no gaps to avoid cheese leakage.
- Place the sealed cheese bombs onto the prepared baking sheet, spacing them evenly.
- Brush the tops generously with the garlic butter mixture, reserving a little for after baking.
- Bake in the preheated oven for 12-15 minutes, or until the biscuits are golden brown and puffed up.
- Remove from the oven and immediately brush with the remaining garlic butter for extra shine and flavor.
- Allow to cool slightly before serving—these are best enjoyed warm with cheese wonderfully gooey inside.
Pro tip from my English roots: don’t rush the sealing process. My grandmother always said, “A good seal keeps the treasure safe!” It truly helps prevent cheesy messes in the oven.
- Prep Time: 15 minutes
- Cook Time: 30 minutes
- Category: Main Dish
- Method: Cooking
- Cuisine: International
Steps to Create Your Pillsbury Biscuit Garlic Butter Cheese bombs
- Preheat your oven to 375°F (190°C) and line a baking sheet with parchment paper to prevent sticking.
- In a small bowl, mix the melted butter with minced garlic, Italian seasoning, salt, and pepper. Set aside to let the flavors meld.
- Open the can of Pillsbury biscuits and separate each biscuit. Using your hands, flatten each biscuit into a 4-inch circle on a clean surface.
- Place about 1 tablespoon of shredded mozzarella and cheddar cheese in the center of each flattened biscuit.
- Carefully fold the edges up and pinch together to seal the cheese inside, forming a small ball. Make sure there are no gaps to avoid cheese leakage.
- Place the sealed cheese bombs onto the prepared baking sheet, spacing them evenly.
- Brush the tops generously with the garlic butter mixture, reserving a little for after baking.
- Bake in the preheated oven for 12-15 minutes, or until the biscuits are golden brown and puffed up.
- Remove from the oven and immediately brush with the remaining garlic butter for extra shine and flavor.
- Allow to cool slightly before serving—these are best enjoyed warm with cheese wonderfully gooey inside.
Pro tip from my English roots: don’t rush the sealing process. My grandmother always said, “A good seal keeps the treasure safe!” It truly helps prevent cheesy messes in the oven. Learn more: Flavor-Packed Lipton Onion Potatoes Recipe You Need to Try
Tips for Making the Best Pillsbury Biscuit Garlic Butter Cheese bombs
Getting these cheese bombs just right is all about attention to detail and technique. From my early kitchen experiments (and a few “brave smile” moments with my family), I’ve learned a few tricks that make a big difference in taste and presentation.
- Use fresh garlic for the butter mixture—it brings a bright, authentic flavor that powdered garlic just can’t match.
- Flatten the biscuits evenly to ensure consistent cooking and a perfect cheese pocket.
- Don’t overfill with cheese; too much can cause the bombs to burst and leak during baking.
- Brush with garlic butter both before and after baking to maximize flavor and keep the tops beautifully golden.
- Try adding a pinch of smoked paprika or chili flakes to the garlic butter for a subtle kick.
- Seal the edges tightly by pinching and folding, a technique I picked up watching pros in restaurant kitchens.
With these tips, you’ll create irresistible cheese bombs that bring smiles and requests for seconds. Learn more: my recipe for homemade garlic butter sauce.
Serving Suggestions and Pairings
This dish is incredibly versatile and works beautifully for various occasions—from casual family dinners to lively weekend get-togethers. I often serve these cheese bombs as finger food during movie nights, paired with simple sides to balance the richness.
- Serve alongside a fresh green salad dressed with lemon vinaigrette to cut through the richness
- Pair with a bowl of tomato soup or marinara sauce for dipping—a nod to my English childhood comfort foods
- Great as an appetizer at parties, paired with sparkling water or a crisp white wine
- For a seasonal twist, add roasted herbs like thyme or rosemary to the garlic butter mixture
Whether it’s a cozy family night or entertaining friends, these cheese bombs always spark conversation and happy memories. My kids love dipping them in ketchup, a reminder that sometimes the simplest pleasures are the best.
Storage and Reheating Tips
Proper storage ensures you can enjoy leftovers just as much as the fresh dish, especially when life gets hectic and meal prep becomes a necessity.
- Store any leftover cheese bombs in an airtight container in the refrigerator for up to 3 days
- To reheat, place in a preheated oven at 350°F (175°C) for 8-10 minutes to restore crispiness
- Avoid microwaving if possible, as it can make the dough soggy and the cheese rubbery
- These freeze well too—freeze unbaked, sealed bombs on a tray, then transfer to a freezer bag for up to 2 months
- Bake from frozen, adding a few extra minutes to the baking time for best results
Meal prepping these is a lifesaver during busy weeks, and the reheated versions still bring plenty of joy at the table.
Frequently Asked Questions
What are the main ingredients for Pillsbury Biscuit Garlic Butter Cheese bombs?
The main ingredients for Pillsbury Biscuit Garlic Butter Cheese bombs include the items listed in our ingredients section above. Each ingredient plays a crucial role in achieving the perfect flavor and texture.
How long does it take to make Pillsbury Biscuit Garlic Butter Cheese bombs?
The total time to make Pillsbury Biscuit Garlic Butter Cheese bombs includes both preparation and cooking time. Check the recipe card above for exact timing details.
Can I make Pillsbury Biscuit Garlic Butter Cheese bombs ahead of time?
Yes, Pillsbury Biscuit Garlic Butter Cheese bombs can often be prepared in advance. Store it properly in an airtight container in the refrigerator and consume within the recommended timeframe.
What can I serve with Pillsbury Biscuit Garlic Butter Cheese bombs?
Pillsbury Biscuit Garlic Butter Cheese bombs pairs well with various sides and accompaniments. Consider the serving suggestions mentioned in the recipe for the best dining experience.
Is Pillsbury Biscuit Garlic Butter Cheese bombs suitable for special diets?
Depending on the ingredients used, Pillsbury Biscuit Garlic Butter Cheese bombs may be adapted for various dietary needs. Check the ingredients list and consider substitutions as needed for your dietary requirements.
Final Thoughts
These Pillsbury Biscuit Garlic Butter Cheese bombs are a perfect little bite of comfort that’s easy to make and impossible not to love. I hope you enjoy making them as much as I do—feel free to share your own twists or stories from your kitchen. After all, cooking is about connection, and I’m so glad you’ve stopped by to share this moment with me.


")