
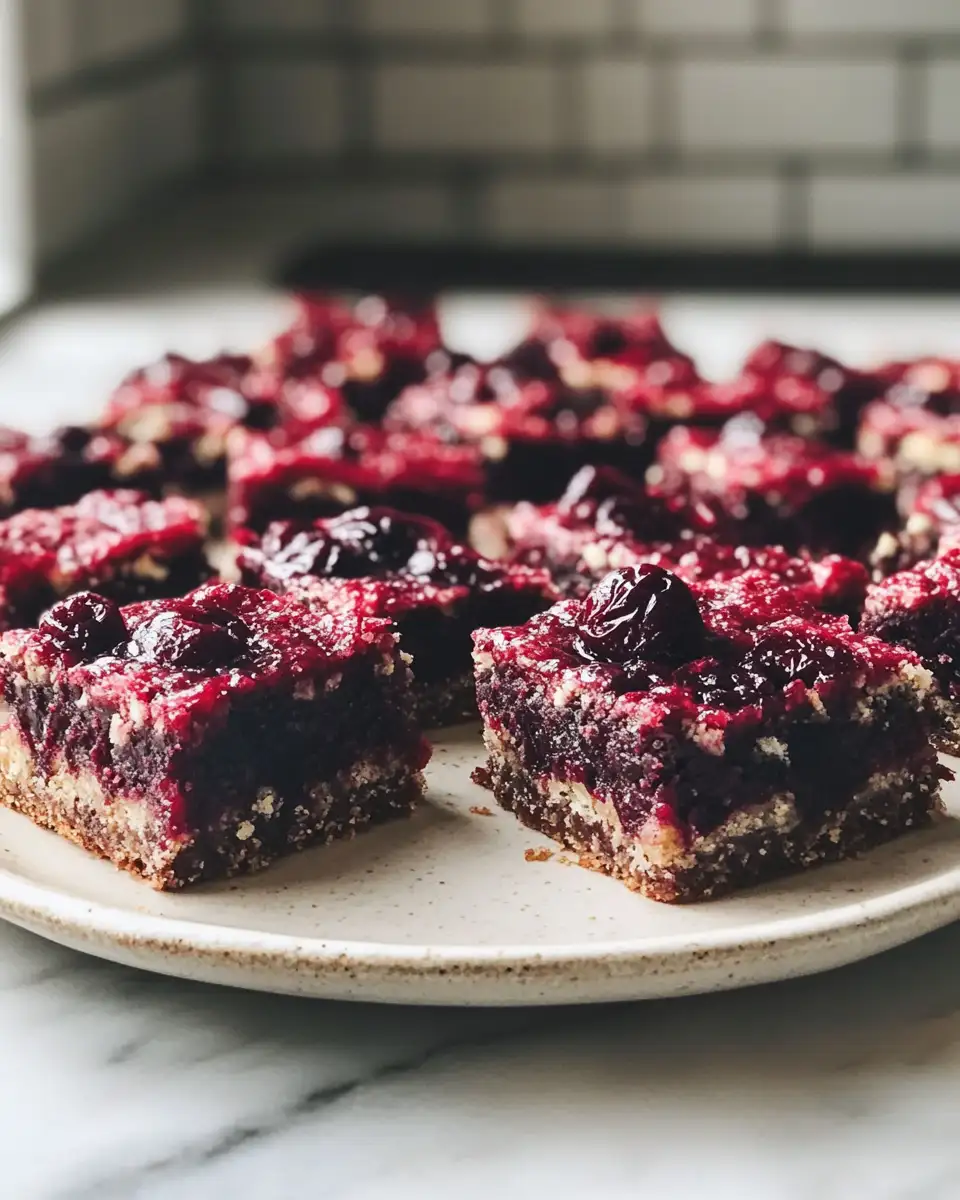
Ruby Red Cherry Bars have this magical way of bringing a touch of sunshine to even the greyest of days. Growing up in a small town in southern England, cherries were a rare treat, and whenever my mum baked something with them, it felt like a celebration. Now, living here in sunny San Diego and juggling the joyful chaos of family life, these bars have become my go-to for a quick, comforting bake that still feels special. They strike that perfect balance—bright, sweet cherries nestled in a buttery crust that’s just the right kind of crumbly. I’m excited to share some deeper insights and tips to help you make these bars a beloved staple in your kitchen too.
Table of Contents
Why You’ll Love This Ruby Red Cherry Bars
There’s something truly heartwarming about Ruby Red Cherry Bars that goes beyond their taste. For me, they’re a wonderful reminder of those afternoons spent baking with my mum and grandmother, where the kitchen was filled with laughter and stories. These bars are wonderfully versatile—bright and fruity but grounded by a tender, buttery base. They’re also incredibly approachable, perfect for busy weeknights or casual weekend treats. Plus, the ruby red cherries add a pop of color and a burst of tartness that keeps every bite interesting, making them a delightful contrast to the sweet, crumbly crust.
Ingredients You’ll Need for This Ruby Red Cherry Bars

The key to these bars lies in selecting the right ingredients, especially the cherries. I always recommend using fresh, ripe cherries if you can find them, but frozen work beautifully too—just be sure to thaw and drain them well to avoid sogginess. The butter should be unsalted and softened to help you get that perfect crumbly texture in the crust. And since this recipe is all about balance, choosing quality vanilla extract and fresh lemon zest really elevates the flavor without complicating the process.
- 2 cups all-purpose flour
- 1/2 cup granulated sugar
- 1 cup unsalted butter, softened
- 1 teaspoon vanilla extract
- 1 teaspoon lemon zest
- 2 cups fresh or frozen pitted cherries, drained if frozen
- 1/4 cup cornstarch
- 1/2 cup brown sugar, packed
- 1/4 teaspoon salt
- Optional: 1/2 teaspoon almond extract for a nutty depth
Nutrition Facts
- Calories: 280 per bar (assuming 12 servings)
- Protein: 3g
- Fat: 15g
- Carbohydrates: 33g
- Fiber: 2g
- Sugar: 18g
- Sodium: 110mg

Irresistible Ruby Red Cherry Bars That Will Sweeten Your Day
Learn how to make delicious Ruby Red Cherry Bars. Easy recipe with step-by-step instructions.
- Total Time: 45 minutes
- Yield: 4 servings 1x
Ingredients
The key to these bars lies in selecting the right ingredients, especially the cherries. I always recommend using fresh, ripe cherries if you can find them, but frozen work beautifully too—just be sure to thaw and drain them well to avoid sogginess. The butter should be unsalted and softened to help you get that perfect crumbly texture in the crust. And since this recipe is all about balance, choosing quality vanilla extract and fresh lemon zest really elevates the flavor without complicating the process.
- 2 cups all-purpose flour
- 1/2 cup granulated sugar
- 1 cup unsalted butter, softened
- 1 teaspoon vanilla extract
- 1 teaspoon lemon zest
- 2 cups fresh or frozen pitted cherries, drained if frozen
- 1/4 cup cornstarch
- 1/2 cup brown sugar, packed
- 1/4 teaspoon salt
- Optional: 1/2 teaspoon almond extract for a nutty depth
Instructions
- Preheat your oven to 350°F (175°C) and line a 9×13-inch baking dish with parchment paper, leaving an overhang for easy removal.
- In a large bowl, combine the flour, granulated sugar, and salt. Add the softened butter and vanilla extract, then use your fingertips or a pastry cutter to mix until the mixture resembles coarse crumbs.
- Reserve about 1 cup of this crumb mixture for the topping, and press the remaining crumbs firmly into the base of your prepared pan to form an even crust.
- In a separate bowl, toss the cherries with cornstarch, brown sugar, lemon zest, and almond extract if using. The cornstarch will help thicken the cherry juices as they bake.
- Spread the cherry mixture evenly over the crust, then sprinkle the reserved crumb topping over the cherries in an even layer.
- Bake for 40-45 minutes, or until the topping is golden and the cherry filling is bubbly. Keep an eye on the crust edges to avoid over-browning.
- Allow the bars to cool completely in the pan before lifting out with the parchment paper. This helps the filling set and makes cutting cleaner.
- Prep Time: 15 minutes
- Cook Time: 30 minutes
- Category: Main Dish
- Method: Cooking
- Cuisine: International
Steps to Create Your Ruby Red Cherry Bars
- Preheat your oven to 350°F (175°C) and line a 9×13-inch baking dish with parchment paper, leaving an overhang for easy removal.
- In a large bowl, combine the flour, granulated sugar, and salt. Add the softened butter and vanilla extract, then use your fingertips or a pastry cutter to mix until the mixture resembles coarse crumbs.
- Reserve about 1 cup of this crumb mixture for the topping, and press the remaining crumbs firmly into the base of your prepared pan to form an even crust.
- In a separate bowl, toss the cherries with cornstarch, brown sugar, lemon zest, and almond extract if using. The cornstarch will help thicken the cherry juices as they bake.
- Spread the cherry mixture evenly over the crust, then sprinkle the reserved crumb topping over the cherries in an even layer.
- Bake for 40-45 minutes, or until the topping is golden and the cherry filling is bubbly. Keep an eye on the crust edges to avoid over-browning.
- Allow the bars to cool completely in the pan before lifting out with the parchment paper. This helps the filling set and makes cutting cleaner.
Tips for Making the Best Ruby Red Cherry Bars
Getting these bars just right is all about balance and technique, particularly when handling the cherries and achieving the perfect crumb texture. I learned this the hard way during my early days in restaurant kitchens—precision matters, but so does a little patience and flexibility.
- Use fresh or thawed cherries that are well-drained to prevent a soggy crust.
- Softened butter is key—too cold and it won’t incorporate well; too melted and the crust will be greasy.
- Don’t skip the lemon zest; it brightens the cherry flavor and cuts through the sweetness beautifully.
- Press the crust firmly into the pan to create a sturdy base that holds up under the juicy filling.
- If you prefer a more intense cherry flavor, macerate the cherries with a tablespoon of sugar for 15 minutes before tossing with cornstarch.
With these tips, you’ll create bars that are both visually stunning and satisfyingly delicious. Learn more: related recipe Learn more: Irresistible Carrot Cake Bars You Need to Try Today
Serving Suggestions and Pairings

Ruby Red Cherry Bars shine in so many settings, from a casual afternoon tea to a relaxed weekend brunch. I often serve them with a dollop of whipped cream or a scoop of vanilla ice cream when my kids demand something a little extra special (which, let’s be honest, is most days). They also pair beautifully with a cup of strong black tea or a light, floral white wine during summer gatherings.
- Serve warm with whipped cream, vanilla ice cream, or crème fraîche
- Pair with a cup of Earl Grey or Darjeeling tea for a classic afternoon treat
- Offer alongside a fresh green salad for a light dessert option after dinner
- Try adding toasted almonds or a drizzle of dark chocolate for an adult twist
Whether it’s a simple family dessert or part of a festive spread, these bars always bring smiles and a bit of nostalgia to the table.
Storage and Reheating Tips
Proper storage is essential to keep your Ruby Red Cherry Bars tasting fresh and delicious for days. These bars are forgiving and even improve slightly in flavor after a day or two, making them perfect for meal prep or baking ahead of time.
- Store bars in an airtight container at room temperature for up to 2 days
- For longer storage, refrigerate for up to 5 days or freeze for up to 3 months
- Reheat gently in a low oven (300°F) for 10 minutes or microwave in short bursts to avoid drying out
- Allow frozen bars to thaw overnight in the fridge for the best texture
Frequently Asked Questions
What are the main ingredients for Ruby Red Cherry Bars?
The main ingredients for Ruby Red Cherry Bars include the items listed in our ingredients section above. Each ingredient plays a crucial role in achieving the perfect flavor and texture.
How long does it take to make Ruby Red Cherry Bars?
The total time to make Ruby Red Cherry Bars includes both preparation and cooking time. Check the recipe card above for exact timing details.
Can I make Ruby Red Cherry Bars ahead of time?
Yes, Ruby Red Cherry Bars can often be prepared in advance. Store it properly in an airtight container in the refrigerator and consume within the recommended timeframe.
What can I serve with Ruby Red Cherry Bars?
Ruby Red Cherry Bars pairs well with various sides and accompaniments. Consider the serving suggestions mentioned in the recipe for the best dining experience.
Is Ruby Red Cherry Bars suitable for special diets?
Depending on the ingredients used, Ruby Red Cherry Bars may be adapted for various dietary needs. Check the ingredients list and consider substitutions as needed for your dietary requirements.
Final Thoughts
Ruby Red Cherry Bars are more than just a dessert—they’re a little piece of home and happiness baked into every bite. I hope these tips and stories inspire you to make them your own, whether it’s your first time or your hundredth. Please drop me a note about how your batch turns out—I love hearing from fellow home cooks and cherry lovers alike!


")