Irresistible Bliss with Coconut and Macadamia Nuts Delicious Recipes
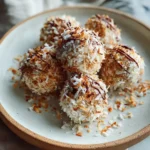
Learn how to make delicious Coconut and Macadamia Nuts. Easy recipe with step-by-step instructions.
- Prep Time: 15 minutes
- Cook Time: 30 minutes
- Total Time: 45 minutes
- Yield: 4 servings
- Category: Main Dish
- Method: Cooking
- Cuisine: International
Ingredients
- 2 cups raw macadamia nuts, roughly chopped
- 1 1/2 cups shredded unsweetened coconut
- 1/2 cup honey or maple syrup (for a vegan option)
- 1/4 cup coconut oil, melted
- 1 teaspoon vanilla extract
- 1/4 teaspoon sea salt
- Optional: 1/4 cup dried cranberries or chopped dried apricots for a fruity twist
If you don’t have macadamia nuts on hand, chopped cashews work beautifully as a substitute—they offer a similar buttery texture. For a sweeter version, you can add a sprinkle of cinnamon or a dash of almond extract, depending on your mood. I like to keep it simple, just focusing on those rich, tropical flavors that remind me of my grandma’s coconut cake and her love for good, honest ingredients.
Instructions
- Preheat your oven to 350°F (175°C). Line a baking sheet with parchment paper to prevent sticking and make cleanup easier.
- In a large mixing bowl, combine the shredded coconut and chopped macadamia nuts. Set aside.
- In a small saucepan over low heat, gently warm the honey (or maple syrup) and coconut oil until just melted and combined. Remove from heat and stir in the vanilla extract and sea salt.
- Pour the warm mixture over the coconut and macadamia mixture. Stir well until everything is evenly coated and sticky enough to hold together.
- Using a spoon or your hands, scoop out small mounds and place them on the prepared baking sheet. Flatten slightly if you prefer them in more of a bar or cluster shape.
- Bake in the preheated oven for about 10-12 minutes, or until the edges are golden brown. Keep an eye on them—these can go from perfect to burnt quickly!
- Remove from the oven and let them cool on the baking sheet for about 10 minutes. They will firm up as they cool, developing that satisfying crunch.
- Once cooled completely, transfer to an airtight container. They’ll keep fresh for up to a week—if they last that long!
My personal tip: I love to toast the coconut slightly before mixing it in. It adds an extra layer of flavor and makes the treats even more addictive. Plus, I always find that baking these with a cup of good company nearby turns the process into a cozy, shared experience—just like my grandma’s kitchen used to be.
Find it online: https://artofeasycooking.com/coconut-and-macadamia-nuts/